


A session is a set of
instructions that tells the Integration Service how and when to move data from
sources to targets. A session is a type of task, similar to other tasks
available in the Workflow Manager.
In the Workflow Manager,
we configure a session by creating a Session task. To run a session, we must
first create a workflow to contain the Session task.
When we create a Session
task, enter general information such as the session name, session schedule, and
the Integration Service to run the session. We can select options to run
pre-session shell commands, send On-Success or On-Failure email, and use FTP to
transfer source and target files.
Configure the session to
override parameters established in the mapping, such as source and target
location, source and target type, error tracing levels, and transformation
attributes. You can also configure the session to collect performance details
for the session and store them in the PowerCenter repository. We might view
performance details for a session to tune the session.
We can run as many
sessions in a workflow as we need. We can run the Session tasks sequentially or
concurrently, depending on the requirement.
The Integration Service
creates several files and in-memory caches depending on the transformations and
options used in the session.
Session Task
We can create a Session task for each mapping that we want the
Integration Service to run. The Integration Service uses the instructions
configured in the session to move data from sources to targets.
We can create a reusable Session task in the Task Developer. We
can also create non-reusable Session tasks in the Workflow Designer as we
develop the workflow. After we create the session, we can edit the session
properties at any time.
Note:
1. The Session we create
in Task Developer is reusable and the Session we create in Workflow Designer is
non-reusable.
2. In Task Developer we
can create only 3 reusable tasks Session, Command and Email.
2. Before we create a
Session task, we must configure the Workflow Manager to communicate with
databases we need a database connection and the Integration Service. We must
assign appropriate permissions for any database, FTP, or external loader
connections you configure.
Creating a Sample Session for Relational Source & Target and
its Settings:
First create a workflow
because to run a session or task(s) we need a workflow/worklet. Follow the link to create a workflow. Once you
create a workflow/workflow follow as below to create a session to the workflow/worklet.

2. It will pop up Task
Creator.

Select the task type to
create: Session
Enter a new name for
this task: s_m_emp_file_test
(s_mappingname)

Select the mapping to
which you want to create session, Click on 'OK' and 'Done'

4. Now, create a link
between tasks Start and s_m_emp_file by using link task.

1st click on Start then
drag it to s_m_emp_file

5. Now, the Session will
be created in Workflow Designer.

Note: The session can be
create for only those mappings which are valid.
Now, we are created
session only. But still we have to set Properties, Config Object,
Mapping, Components details.
Double-click the Session task to open the session properties.
Enter session name, mapping name, and description for the Session
task, assign resources, and configure additional task options.

Rename: You can rename session with the Rename
button.
Make reusable: By check this option you can make this
session reusable. (But once you make it reusable, you cannot revert it back to
non-reusable session).
Description: Session description.
Mapping Name: Mapping associated with the session task.
Fail Parent if This Task
Fails: Fails the parent
worklet or workflow if this task fails.
Fail Parent if This Task
Does Not Run: Fails the parent
worklet or workflow if this task does not run.
Disable This Task: Disables the task.
Treat the Input Links as
AND or OR: Runs the task when
all or one of the input link conditions evaluate to True.
2) Properties Tab:
Enter session log information, test load settings, and performance
configuration.

Note: You can click in
'+' to expand settings.
We can configure the following settings:

Write Backward
Compatible Session Log File: Check this if you do not want to use Log Service but instead
want to write the session log to a file
Session Log File Name: Log file name (s_sessionname.log) or you
can also use the $PMSessionLogFile session parameter.
Session Log File
directory: Log file path, by
default $PMSessionLogDir\. (You can change if you want to log in other path).
Parameter File Name: Parameter File Name used to define session
parameters and override values of mapping parameters/variables.
Enable Test Load: To test the load without writing data to the targets.
It will perform all the tasks it do for normal load.
Number of Rows to Test: Define the no of records to test for load.
$Source connection value: Database connection name used to fetch source data. (You can
also you session parameter as $DBConnectionName)
$Target connection value: Database connection name used to write data to target. (You
can also you session parameter as $DBConnectionName)
Treat source rows as: How the source/input rows to be treat
(Insert/Delete/Update/Data driven).

Note: Data driven is
used if your mapping having Update Strategy transformation or a Custom transformation and the default option is
Data Driven.
Commit Type: Determines
if the Integration Service uses a Source-based, target-based, or user-defined
commit interval.

Commit Interval: By default, the Integration Service uses a commit interval
of 10,000 rows.
Commit On End Of File: By default, this option is enabled and the Integration
Service performs a commit at the end of the file. This option is enabled by
default for a target-based commit.
Rollback Transactions on Errors: Service will rolls back the transaction at the next commit
point when it encounters a non-fatal writer error.
Recovery Strategy: Recovering the session run on failure.
- Fail task and continue the workflow: The Integration
Service cannot recover the session, but it continues the workflow. This is
the default session recovery strategy.
- Resume from the last checkpoint: The Integration
Service saves the session state of operation and maintains target recovery
tables.
- Restart task: The Integration Service runs the session again when it recovers the workflow.

b. Performance
Settings:
The Performance settings allow you to increase memory size,
collect performance details, and set configuration parameters.

DTM buffer size: Amount of memory allocated to the session from the DTM
process.
By default 'Auto'. The Workflow Manager allocates a minimum of 12
MB for DTM buffer memory.
You can specify auto or a numeric value. If you enter 2000, the
Integration Service interprets the number as 2000 bytes. Append KB, MB, or GB
to the value to specify other units. For example, you can specify 512MB.
Collect performance data: Collects performance details when the session runs. Use the
Workflow Monitor to view performance details while the session runs.
Write Performance Data to Repository: Writes performance details for the session
to the PowerCenter repository. Write performance details to the repository to
view performance details for previous session runs.
Incremental Aggregation: The Integration Service performs incremental aggregation.
Reinitialize Aggregate Cache: Overwrites existing aggregate files for an incremental
aggregation session.
Enable High Precision: Processes the Decimal datatype to a precision of 28.
Session Retry On Deadlock: The Integration Service retries target writes on deadlock
for normal load. You can configure the Integration Service to set the number of
deadlock retries and the deadlock sleep time period.
Pushdown Optimization: Default is None. The Integration Service analyzes the
transformation logic, mapping, and session configuration to determine the
transformation logic it can push to the database. Select one of the following
pushdown optimization values:
- None: The Integration Service does not push any
transformation logic to the database.
- To Source: The Integration Service pushes as much
transformation logic as possible to the source database.
- To Target: The Integration Service pushes as much
transformation logic as possible to the target database.
- Full: The Integration Service pushes as much
transformation logic as possible to both the source database and target
database.
- $$PushdownConfig: The $$PushdownConfig mapping
parameter allows you to run the same session with different pushdown
optimization configurations at different times.
3) Config Object tab:
Enter advanced settings, log options, and error handling
configuration.

a. Advanced:
Advanced settings allow
you to configure constraint-based loading, lookup caches, and buffer sizes.

Constraint based load ordering: Loads data to the targets based on primary key-foreign key
constraints.
Cache LOOKUP() function: Select this if you want to cache the lookup table/file. If
not selected, the Integration Service performs lookups on a row-by-row basis,
unless otherwise specified in the mapping.
Default buffer block size: The size of buffer blocks used to move data and index caches
from sources to targets. By default 'Auto', the Integration Service determines
this value at run time.
Line Sequential buffer length: Default of 1024 bytes the PowerCenter Integration Service
reads for each line. If source flat file records are larger than 1024 bytes
then increase it.
Maximum Memory Allowed for Auto Memory Attributes: Maximum memory allocated for automatic
cache when you configure the Integration Service to determine session cache
size at run time.
If the value is set to zero, the Integration Service uses default
values for memory attributes that you set to auto.
Maximum Percentage of Total Memory Allowed for Auto Memory
Attributes: Maximum percentage
of memory allocated for automatic cache when you configure the Integration
Service to determine session cache size at run time. If the value is set to
zero, the Integration Service uses default values for memory attributes that
you set to auto.
b. Log options:
Log options allow you to
configure how you want to save the session log. By default, the Log Manager
saves only the current session log.

Save session log by: Save session log by timestamp or by number of runs. (You can
also use the $PMSessionLogCount service variable)

Save session log for these runs: Specify the number of runs of historical session log to
save. $PMSessionLogCount can also be used.
Session Log File Max Size: Default is zero. If you set the size to zero the session log
file size has no limit. Maximum size (in MB) of the partial session log after
which we will rollover to the next partial session log file.
Session Log File Max Time Period: Default is zero. Maximum number of hours
that the Integration Service writes to a session log file. Configure the
maximum period to enable log file rollover by time. When the period is over,
the Integration service creates another log file.
Maximum Partial Session Log Files: Default is 1. Maximum number of session
log files to save. The Integration Service overwrites the oldest partial log
file if the number of log files has reached the limit. If you set the maximum
number to 0, the number of session log files is unlimited.
Writer Commit Statistics Log Frequency: Default is 1. Frequency that the
Integration Service writes commit statistics in the session log. The
Integration Service writes commit statistics to the session log after the
specified number of commits occurs. The Integration Service writes commit
statistics after each commit.
Writer Commit Statistics Log Interval: Time interval, in minutes, to write commit
statistics to the session log. The Integration Service writes commit statistics
to the session log after each time interval.
c. Error handling:
Error Handling settings
allow you to determine if the session fails or continues when it encounters
pre-session command errors, stored procedure errors, or a specified number of
session errors.

Stop on errors: Indicates how many non-fatal errors the Integration Service can
encounter before it stops the session. By default it is '0'.
Override tracing: The amount of detail that logs is depends on the tracing
level that you set. You can configure tracing levels for each transformation or
for the entire session. By default, the Integration Service uses tracing levels
configured in the mapping.
Setting a tracing level for the session overrides the tracing
levels configured for each transformation in the mapping.

Tracing Level:
- None: Integration
Service uses the tracing level set in the mapping.
- Terse: Integration
Service logs initialization information, error messages, and notification
of rejected data.
- Normal: Integration
Service logs initialization and status information, errors encountered,
and skipped rows due to transformation row errors. Summarizes session
results, but not at the level of individual rows.
- Verbose Initialization: In addition to normal tracing, the Integration
Service logs additional initialization details, names of index and data
files used, and detailed transformation statistics.
- Verbose Data: In
addition to verbose initialization tracing, the Integration Service logs
each row that passes into the mapping. Also the Integration Service
truncates string data to fit the precision of a column and provides
detailed transformation statistics. When you configure the tracing level
to verbose data, the Integration Service writes row data for all rows in a
block when it processes a transformation.
4). Mapping tab:
Enter source and target
information, override transformation properties, and configure the session for
partitioning.

The Transformations view
of the Mapping tab contains the following nodes:
- Start Page. Describes
the nodes on the Mapping tab.
- Connections. Displays
the source, target, lookup, stored procedure, FTP, external loader, and
queue connections. You can choose connection types and connection values.
You can also edit connection object values.
- Memory Properties. Displays
memory attributes that you configured on other tabs in the session
properties. Configure memory attributes such as DTM buffer size, cache
sizes, and default buffer block size.
- Files, Directories, and Commands. Displays file names and directories for the
session. This includes session logs reject file, and target file names and
directories.
- Sources. Displays
the mapping sources and settings that you can configure in the session.
- Targets. Displays
the mapping target and settings that you can configure in the session.
- Transformations. Displays
the mapping transformations and settings that you can configure in the
session.
Passing relational
database connection to Source Instance.

- Select source instance (Source Qualifier) under Sources
Folder from Left Navigator.
- Readers: Relational
Reader.
- Connection Value: Click
on open browser to select relational connection.
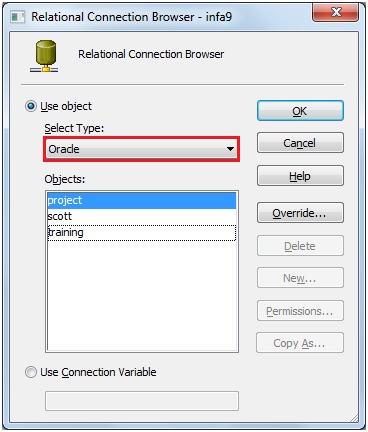
- Select Object Type: Oracle
(database type)
- Objects: project
(Connection to fetch/load data)
Click 'OK'
Under properties we can
override the conditions defined at mapping values. By changing attribute
values.

Note: Owner Name can be
defined in case you don't have any sql override at mapping/session level. The
Owner Name is nothing but the schema name. We will be define this if the source
table is exist in more than one schema.

1. Owner Name: It is
nothing but Schema Name in which the target table exist.
2. Source Table Name: It
is define in case session is used to load the data into similar structure table
in same schema or another schema

- Select the Target Instance under Targets Folder
- Writes: Relational Writer
- Connections Value: Click on open browser to select
relational connection.
- Select Object Type: Oracle (database type)
- Objects: project
(Connection to fetch/load data)
Click 'OK'
Under properties we can
override the conditions defined at mapping values. By changing attribute
values.

Attribute and its Value:
Target Load Type: Normal/Bulk
Insert: Select this to insert only
Update as update: Select this to update the existing records.
Update as Insert: Select this to Insert the existing records
as update. (Note: You also need to select 'Insert').
Update else Insert: Select this if you using update strategy
in the mapping and implemented 'Insert else Update' or 'Update else Insert'
logic.
Delete: Select this to delete the records based on
the mapping logic.
Truncate target table
option: To truncate the
target table before it start 'Insert/Update/Delete'
Reject file directory: use default unless it required to change.
Reject filename: use default or you can name to reject
file.
Reject
Truncated/Overflowed rows: Select
this if you want to write ' truncated or overflowed rows are rejected' to the
reject file while loading to target table.'
Update Override: You can add 'where' clause to use for an
update session
Table Name Prefix: It is nothing but Schema Name in which the
target table exist.
Target Table Name: It is define in case session is used to
load the data into similar structure table in same schema or another schema
5. Components tab:
Configure pre- or
post-session shell commands and emails.

Pre-Session Command: This command will execute before the
session starts.
Pre-Session Command Type can be None/Reusable/Non-reusable.
Post-Session Success
Command: This command will
execute after session success.
Post-Session Success Command Type can be None/Reusable/Non-reusable.
Post-Session Failure
Command: It will execute on
Session Failure.
Post-Session Failure Command Type can be None/Reusable/Non-reusable.
On Success E-Mail: It sends email on session success.
On Success E-Mail Type can be None/Reusable/Non-reusable.
On Failure E-Mail: It sends email on session failure.
On Failure E-Mail Type can be None/Reusable/Non-reusable.
Pre-session variable
assignment: It will assign
workflow or worklet variable values to mapping variables, mapping parameters
and session parameters.
Pre-session variable assignment Type is Non-reusable
Post-session on success
variable assignment: It will assign
mapping variable, mapping parameters and session parameters to parent workflow
or worklet variables.
Post-session on success variable assignment Type is Non-reusable.
Post-session on failure
variable assignment: It will assign
mapping variable, mapping parameters and session parameters to parent workflow
or worklet variables.
Post-session on failure variable assignment Type is Non-reusable.
Note: You can change Task type by clicking on
'Type' Which will give you drop down (None/Reusable/Non-reusable).
Click 'OK'. (Here we are
done with session setting, go ahead and run your session).

We can the session in
two ways:
1. Select 'Start' and
right click and 'Start Task' or 'Start Workflow From Task'.

2. Select session
's_m_emp_file' and right click and 'Start Task' or 'Start Workflow From Task'.

Note:
Start Task: It will run
the selected instance only.
Start Workflow From Task:
It will run the workflow from the selected instance to end instance.
Exellent Explantion BOSS it was ver useful for us
ReplyDeleteExcellent
ReplyDeletehttp://mkashu.blogspot.com
Great job.
ReplyDeleteAwesum Dude..!! really Impressive.. Hell lot of research man... RESPECT !!!
ReplyDeleteGreat Job...Helps a lot.
ReplyDeleteHi,
ReplyDeleteincredible and awesome ...very Useful
Thanks a lot..
Awesome Buddy
ReplyDeleteToo Helpful! Great job -- Manaswini
ReplyDeleteGreat job Dude..!!
ReplyDeleteexcellent information thank you very much
ReplyDeleteHelpful ...
ReplyDeleteCan't express in words how it can help all of us. Salute Man !!!!
ReplyDeleteThanks Gowtham
thanks Gowtham.. its wonderful
ReplyDeleteFor the attribute value, how do I set the session to 'Insert Else Update'?
ReplyDeleteawesome work...............
ReplyDeleteReally good blog, thanks a lot for detailing all these out.
ReplyDeleteThis makes a proper channel to filter in the market to serve a better situation in the market.
ReplyDeleteStock Cash Tips
NCDEX Trading Tips