


Slowing Chaining Dimension
Type 1:
Slowing Chaining Dimension
Type 1 is used to maintain latest data by comparing the existing data from the
target. It will insert the new records and update the new data by overwriting
the existing data for those records. All the records contain current data only.
Type 1 Dimension used to update the table when you do not need to keep
any previous versions of data for those records.
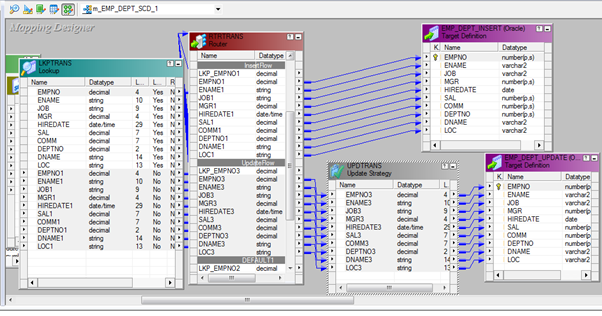
Sample Mapping:
This sample mapping is to show case how SDC 1 is work and in this exercises we are not compare column to column for updated to check is there any change in exist record. In this we are only check for Primary Key if exist then Update else Insert as new.
Please connect & open the Repository Folder where you want to create mapping and workflow.
2. Select Tools --> Mapping Designer

4. Drag & Drop required source instance to mapping. (Here I have replace 2 source qualifier instance with one).
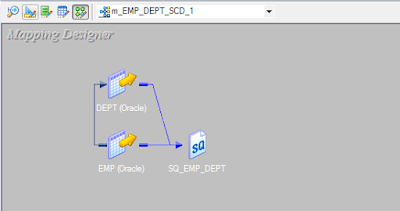
5. Double click on Source Qualifier --> Go to Properties Tab --> Under that click on "down arrow" opposite to "User Defined Join" as below.

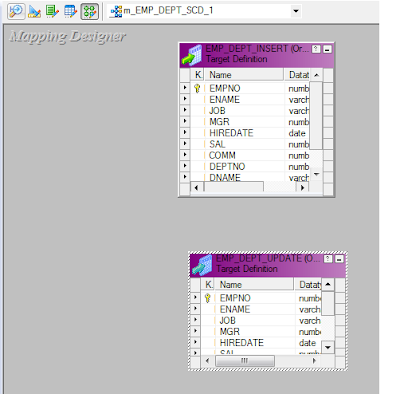
6. Drag & Drop target table to mapping (take 2 instances one for Insert and other for update process)
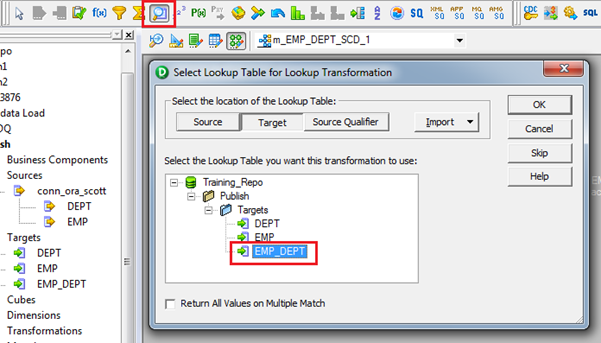
7. Add Lookup to the Mapping. The lookup instance is on target table to exist the income records are exist of not for insert else update them. (Here the lookup is connected one).
Here we are need to lookup on target table so select the location of the lookup table as "Target" and select the table from the list under Targets folder as show below.
9. Now Drag the required columns from Source qualifier to lookup transformation as below.
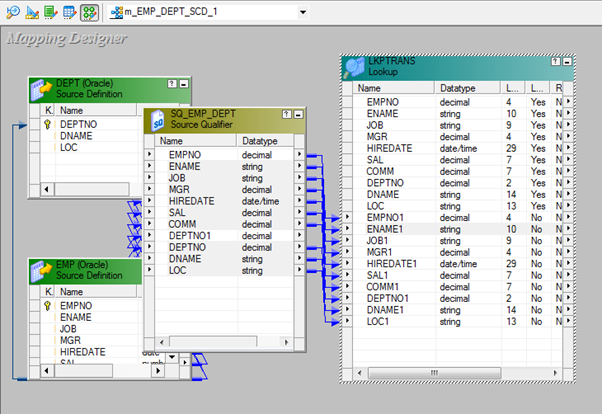

Note: Lookup Table Column are from Lookup table (Left side of the image)
Transformation Port the column drag from Source qualifier (Right side of the image).
select the required column for match condition as show above.
11. Drag Lookup Primary Key (EMPNO from lookup) and all other column dragged from source qualifier to lookup are drag to Router Transformation to route/separate records for insert and update.

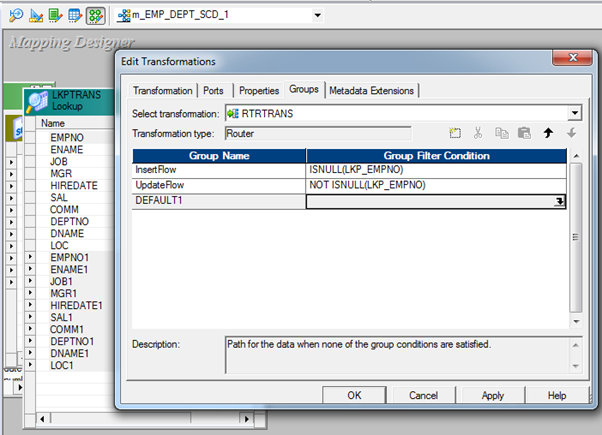
13. Condition to separate records for Insert and Update.
Double click on Router Transformation -- > go to Group tab. To create 2 groups one for insert condition and other for update condition.
For InsertRow Group: ISNULL(LKP_EMPNO)
Note: If case lookup Empno is null mean there is no matching record in target so they go for Insert
For UpdateRow Group: NOT ISNULL(LKP_EMPNO)
Note: If case lookup Empno is not null mean there is matching record in target so they go for Update
14. From InsertRow Group of Router Transformation mapping columns to Target Table instance taken for Insert (Note: Default incoming rows type is insert that is why here we are not using update strategy for insert flow)
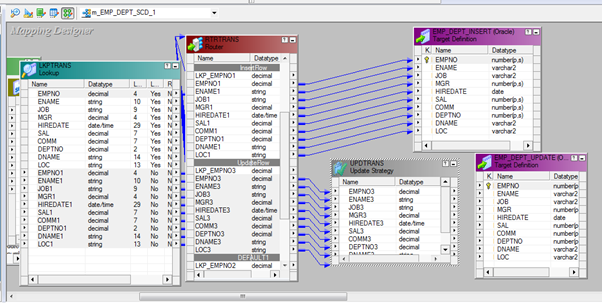
15. Add update strategy to flag incoming records for update purpose. Drag required column from Router Transformation - UpdateRow type Group as show above
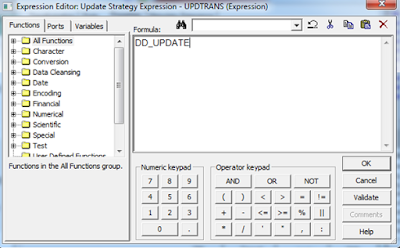
16. Double click on Update Strategy --> go to Property tab
under "Update Strategy Expression" write: DD_UPDATE as shown below
18. Create the workflow for the above mapping.
19. Connect and Open the folder under which you have created the mapping.
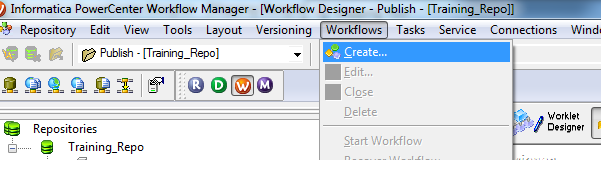
20. Select "Workflows" from the menu --> Click on "Create..." as shown below
21. It will Pop Up the below screen. Entry the name for the workflow.


Then select the target folder in the left side navigator, then select (EMP_DEPT_UPDATE) to assign database connection. Click on the down arrow button to get the list of connection available for this repository and select required one from the list. ex: orac_conn_practice it is connection name pointing to Practice database in this example,
In properties session select update values for update data into target

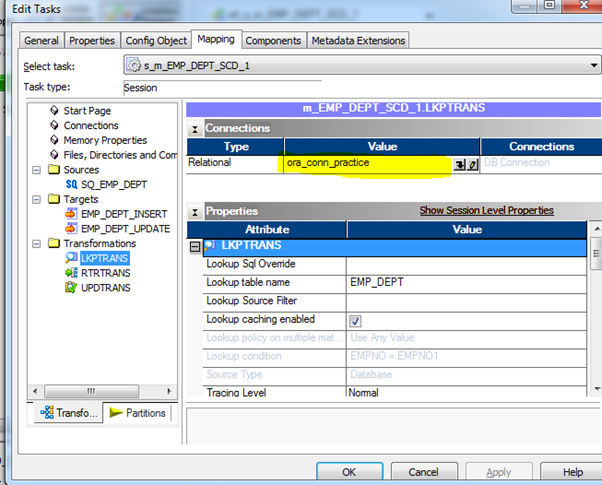
similarly then select the transformation folder in the left side navigator, then select (LKPTRANS) to assign database connection. Click on the down arrow button to get the list of connection available for this repository and select required one from the list. ex: orac_conn_practice it is connection name pointing to Practice database in this example,
Then click on "Apply" and "Ok".
Save the session and workflow.
Then run the session/workflow.
When you run the session first time all the records will be inserted. In below screen i have modified few records no 2, 3 and 7 so when you run the job second time they will be updated.


Please connect & open the Repository Folder where you want to create mapping and workflow.
1. Connect and Open the folder if not already opened.
2. Select Tools --> Mapping Designer

4. Drag & Drop required source instance to mapping. (Here I have replace 2 source qualifier instance with one).

5. Double click on Source Qualifier --> Go to Properties Tab --> Under that click on "down arrow" opposite to "User Defined Join" as below.
Then click on "Ok", "Apply" and "Ok".
6. Drag & Drop target table to mapping (take 2 instances one for Insert and other for update process)

7. Add Lookup to the Mapping. The lookup instance is on target table to exist the income records are exist of not for insert else update them. (Here the lookup is connected one).
Here we are need to lookup on target table so select the location of the lookup table as "Target" and select the table from the list under Targets folder as show below.
Then Click on "OK"
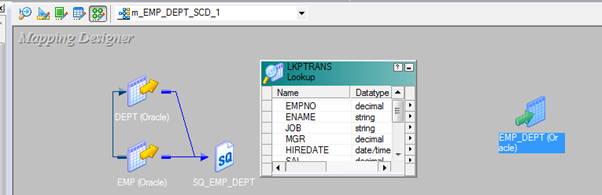
8. The lookup instance will be added to mapping as shown below.
9. Now Drag the required columns from Source qualifier to lookup transformation as below.
10. To defined the lookup condition, double click on lookup transformation --> go to condition tab
Note: Lookup Table Column are from Lookup table (Left side of the image)
Transformation Port the column drag from Source qualifier (Right side of the image).
select the required column for match condition as show above.
11. Drag Lookup Primary Key (EMPNO from lookup) and all other column dragged from source qualifier to lookup are drag to Router Transformation to route/separate records for insert and update.
13. Condition to separate records for Insert and Update.
Double click on Router Transformation -- > go to Group tab. To create 2 groups one for insert condition and other for update condition.
For InsertRow Group: ISNULL(LKP_EMPNO)
Note: If case lookup Empno is null mean there is no matching record in target so they go for Insert
For UpdateRow Group: NOT ISNULL(LKP_EMPNO)
Note: If case lookup Empno is not null mean there is matching record in target so they go for Update
14. From InsertRow Group of Router Transformation mapping columns to Target Table instance taken for Insert (Note: Default incoming rows type is insert that is why here we are not using update strategy for insert flow)

15. Add update strategy to flag incoming records for update purpose. Drag required column from Router Transformation - UpdateRow type Group as show above
16. Double click on Update Strategy --> go to Property tab
under "Update Strategy Expression" write: DD_UPDATE as shown below

17. Map the required columns from Update Strategy to Target Instance taken for Update flow.
18. Create the workflow for the above mapping.
19. Connect and Open the folder under which you have created the mapping.
20. Select "Workflows" from the menu --> Click on "Create..." as shown below
21. It will Pop Up the below screen. Entry the name for the workflow.
Then Click on "OK".
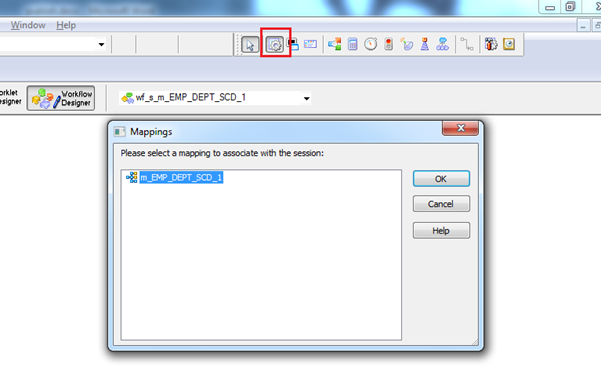
22. Create the session for the mapping by click the icon highlighted in red colour in below screen. It will Pop up the Mappings list, from the list the mapping for which you want to create this session. As shown below.
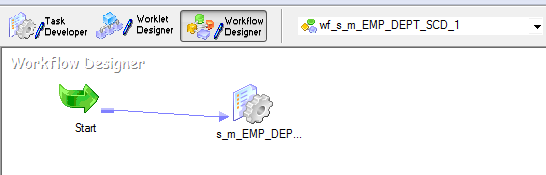
Now, the session got create, Then link the session with start icon as below.
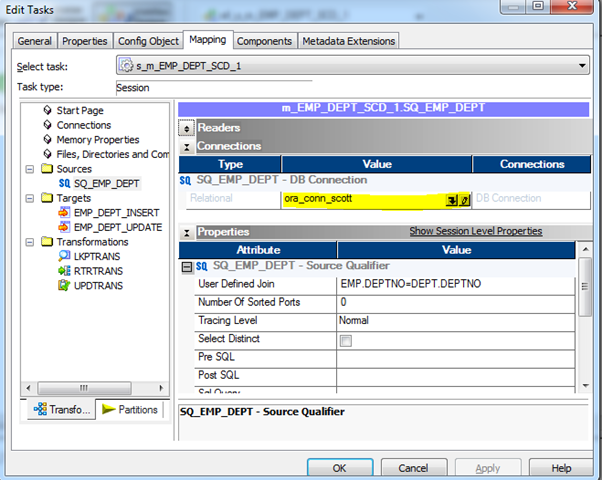
Double click on Session then go to --> Properties tab:

By default Treat source rows as will be insert but whenever you will add update strategy in the mapping. Automatically Treat source rows as will be changed to Data Driven. (highlighted in yellow in above screen).
Then go to --> Mapping tab to assign/map source, target and lookup database connection information
Go to Sources folder in the left side navigator, then select the source (SQ_EMP_DEPT) to assign database connection. Click on the down arrow button to get the list of connection available for this repository and select required one from the list. ex: orac_conn_scott it is connection name pointing to Scott database in this example,
similarly go to Target folder in the left side navigator, then select the target (EMP_DEPT_INSERT) to assign database connection. Click on the down arrow button to get the list of connection available for this repository and select required one from the list. ex: orac_conn_practice it is connection name pointing to Practice database in this example,
In properties session select Insert values for insert data into target
Then select the target folder in the left side navigator, then select (EMP_DEPT_UPDATE) to assign database connection. Click on the down arrow button to get the list of connection available for this repository and select required one from the list. ex: orac_conn_practice it is connection name pointing to Practice database in this example,
In properties session select update values for update data into target
Then click on "Apply" and "Ok".
Save the session and workflow.
Then run the session/workflow.
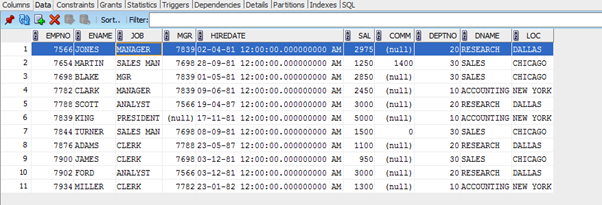
When you run the session first time all the records will be inserted. In below screen i have modified few records no 2, 3 and 7 so when you run the job second time they will be updated.
In this below screen records highlighted with red box are modified/updated records and highlighted in green box are newly inserted 3 records
Other records which are not highlighted are overwritten records as they dint have any changed.
Below is the session details where 3 records are inserted and 11 records are updated ( 3 modified and 7 overwritten).
az 104 interview questions
ReplyDeletescrum master interview questions
dp 900 interview questions
This comment has been removed by the author.
ReplyDeleteYour writing style is so engaging, and this article was no exception. I had a great time going through it. The information about market trends was particularly useful. Thanks for sharing your expertise! By the way, have you tried trading on Radhe exchange? visit at - radheexchange id
ReplyDeleteThank you for sharing such insightful and well-researched information in this blog post. It's clear that you've put a lot of effort into addressing this topic comprehensively. I really appreciate the way you've presented the facts and provided valuable perspectives. Looking forward to reading more from you! Salesforce Marketing Cloud Training
ReplyDeleteThis comment has been removed by the author.
ReplyDeleteDiscover top-tier Data Center in Ireland. Our cutting-edge facilities offer unparalleled reliability and security for your data needs.
ReplyDelete