


Slowly Changing Dimension Type 2 - Effective Date
Range:
The Slowly Changing Dimension Type 2 is used to
maintain complete history in the target. The source rows based on user-defined
comparisons and inserts both new and changed (as a new entry) dimensions into
the target.
Changes are tracked in the target table by
maintaining an effective date range for each version of each dimension in the
target. In the Type 2 Dimension/Effective Date Range target, the current
version of a dimension has a begin date with no corresponding end date.
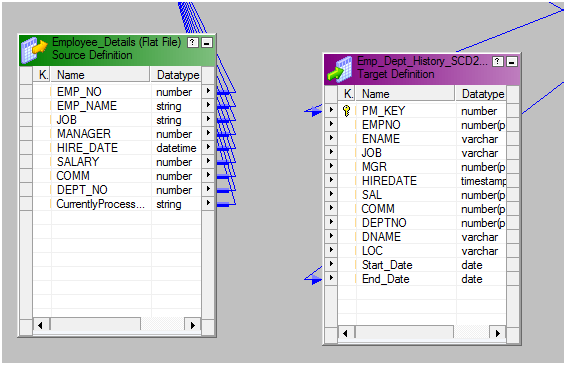
In the below scenario trying the maintain the history for Employee details in case ENAME, JOB, MGR, SAL, COMM and DEPTNO get change. So that complete history of changes can be maintained using SCD type 2.
Below is the final mapping snaps using Dynamic Lookup:

Please connect to the Repository and open Folder
where you want to create mapping and workflow.
1. Connect and Open
the folder if not already opened.
2. Select Tools --> Mapping
Designer

3. Select Mappings --> Create -->
Entry the mapping name you want to create. Then click on "OK".

4. Drag the Source and Target definitions into
workspace if they are already exist. If not click here to know how to create or
import Table definitions.
Note: Take 2 instance of target one for insert
new & change records as insert and another for update the history record.
5. Add a Lookup transformation on target table
from menu Select 'Transformation' from Menu --> Create

It will pop up below screen, entry the name for
the lookup transformation, click on Create and Done

Or
You can create lookup from icon as show below
select lookup icon highlighted

This is popup a below screen select the location
of the lookup table as Target as we need to maintain history for the target
table and select the lookup table you want from the tables list then click on
OK.

This will create lookup in workspace.
6. Drag/map the ports all/required to lookup
transformation from source qualifier
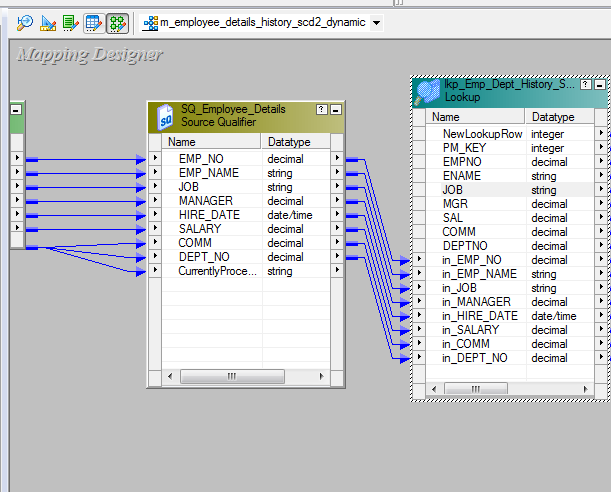
7. Edit the lookup transformation go to --> Condition tab to
defined lookup condition and then click on OK
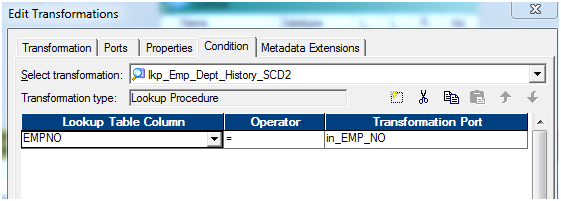
Note: Lookup condition can be one or more ports
Double click on Lookup to edit and goto --> Properties tab
click on check box "Dynamic Lookup Cache", "Insert Else Update" & "Output Old Value on Update" as highlighted below.
Update Dynamic Cache Condition as "True"

This will create a New port (non editable) "NewLookuRow" which will generate 0, 1 & 2.
Note: 0 for Insert (New Record), 1 for Update (Change Record) and 3 for Reject (No Change in Record).

Under Associated Expression select the source columns against lookup columns as shown above.
Then Click on Ok.
8. Add a Router transformation to route flagged records for insert/update history table. Drag/map the ports from lookup to router transformation to check the incoming records are new/changed.
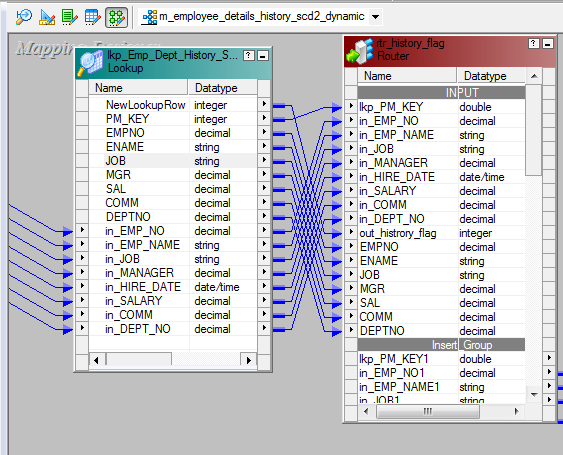
Edit the router transformation and goto --> Group tab to create 2
groups one for insert and another for update

In Insert Group use flag as “0” and “1” where 0
is for complete new records & 1 is for modified records as new insert in
history table.
In Update Group use flag as “1” to table only
modified records which is used to close existing record in the target table as
history record
Then Click on OK
9. Add a sequence generator & expression where the sequence is used to generate sequence values while inserting new/modified records to the target table and expression is used to get “SESSSTARTTIME” which is to known when the records is inserted in history table
Drag port from Insert Group of Router transformation

Sequence: Edit go to Properties table to defined
start value as “0”, increment by “1”, End Value let it default only (otherwise
you can defined whatever you want)

Then Click OK
Note: Do not check cycle or reset as this is used
for history table
Expression: Edit go to --> Ports tab

Add an output port for Start_Date as “SESSSTARTTIME”
Then Click OK
10. Add a Update Strategy
next to expression used for insert flow as below
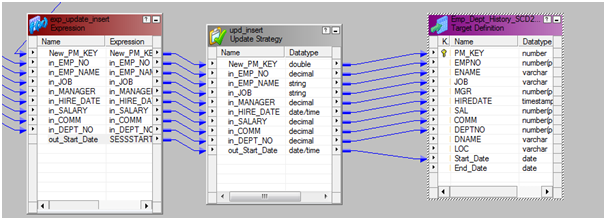
Edit and go to --> Properties tab under Update
Strategy Expression define “0” which indicate insert (dd_insert)

Then Click OK
Then map related column with target instance and
the Port created for “SESSSTARTTIME” under previous
expression map with start_date column of the insert target instance
11. Add an expression next to router
transformation for update flow, drag lookup pm key from update group of router
transformation as show below
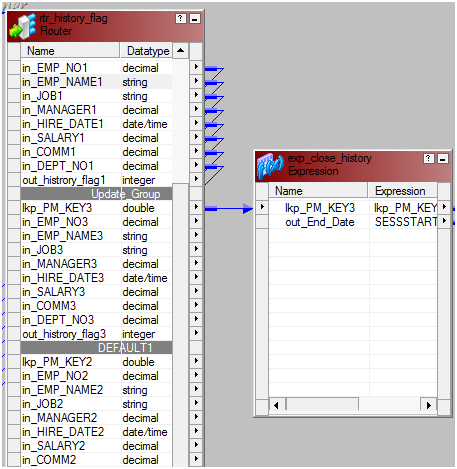
Edit and go to --> Property tab and add
output port as End_Date

Then Click OK
12. Add Update Strategy next to expression to
update history table for those modified records

Edit and go to --> Properties under Update
Strategy Expression defined as “1” which is dd_update

Then Click OK
Then map the lookup PM to PM, End_date to
End_Date from Update Strategy to Update Target Instance.
13. Select 'Mapping' from Menu --> Validate.

14. Select 'Repository'
from Menu --> Save.

when i update my source and i run it. instead of updating the record in the target and changing the enddate and inserting the updated record as new record and creating a startdate for. it will update the exsiting record with the enddate but will not insert the new record with the startdate and unless i re-run the workflow again before it inserts the new one with the startdate in my target. so for one update at the source i have to run the workflow twice
ReplyDeletenewlkprow port values are given wrong.. 0 means no changes to cache,1 means insert and 2 means update!!
ReplyDelete